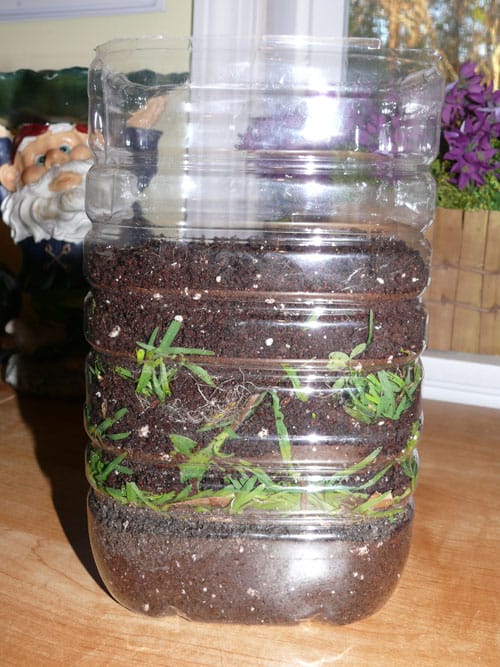
Hands down, my son’s favorite homeschool garden project when he was little was when we decided to make a red wiggler worm habitat. It was a super cheap project that yielded almost immediate results and it had a visible positive effect on the health and wellness of our garden.
If you have a clear gallon jug with the top removed, you can create your own little worm habitat and get them ready to go have the time of their lives in your compost pile!
Here’s what you need to make your red wiggler worm habitat:
- Worms – Years ago we were able to buy a container of fifty worms for around $3.99 at our local PetSmart. The current price at PetSmart for a cup of 24 worms is around $4.24. You should be able to get these at most pet stores.
- Soil – You can use any basic potting soil, but we used some organic seed starting medium. It’s lightweight and holds moisture well, but doesn’t clump together like other soil. It’s important that the soil is moist (similar to the way garden soil should be once you dig down past the dry top layer), but not sopping wet. This is probably just common sense, but it’s important to remember that if it’s too dry, they’ll dehydrate, and if it’s too wet, they’ll drown.
- Bedding material – Layered grass and leaves with the soil gives the worms a cozy place to dig and work.
- Food – Worms will eat anything that you’d ordinarily put into the compost bin — only in smaller amounts. Fruit and vegetable scraps are good suggestions. Avoid feeding them oils, meats, dairy or breads. Egg shells would be ok, but some recommend cooking them first. We mostly just used coffee grounds and the diced and finely shredded scraps from our fruits and veggies. They will eat about half their body weight each day, so feed them accordingly. Too much food may cause the habitat to have an odor.
- Darkness – Worms are not fond of light. And definitely, keep it out of the sun else you might cook them. We kept ours in a cool, dark place and then took the jug out when we wanted to watch them work.

This is what we did:
After bringing the wigglers home, it didn’t take long for them to make their way down deep into the layers of the habitat, some preferring to lounge in the soil, while others made their bed in the grass layers.
We used an old knee-high stocking that we were able to stretch over the top of the habitat. (Amazing how stretchy those things can be!) That allows the air to circulate, but also keeps the worms safe from any potential invaders, or from somehow making their way out.
The first morning after we brought them home, I added the damp filter and some moist grounds from my morning coffee to the top of the habitat layers — after cooling them a bit, of course. We chose to do this rather than mixing them directly into the soil. This way, the worms were able to make their way up for a meal if they desired, but they weren’t forced to feast on the grounds until they were ready.

The soil was already slightly moist before we ever added the worms.
Once we observed these Red Wigglers in action for a couple of weeks, we moved them into their new digs (pun totally intended ????) in our newly-constructed wood-pallet composting bin.
Learn about how to get started composting here.
Here are some great topics you can discuss with your homeschooler:
- What is Vermiculture?
- What do worms eat?
- Where do worms like to live and sleep?
- Will they reproduce?
- Why do we want worms in our compost pile? (What important role can they play in the composting process?)


